
Welcome back! Let’s continue mobile web testing, this time on Android, using the same Nightwatch test script we used for iOS. Previously in Part 1, we tackled the basic set-up for Nightwatch and explained how it works along with its close relationship to the Selenium Server. We also shared an example to run on an iOS device by integrating Nightwatch into the Appium server.
Prerequisites from Part 1
- Appium installed globally - appium-doctor installed globally - nightwatch repository installedIn Part 2, we will use Appium again, but introduce you to Selendroid, along with added steps if testing Android 4.2.2 or older, installing a browser (Chrome) into the virtual device and other Android specific tools. Please check out Mobile Web Testing Using Nightwatchjs (Part 1) if you have not already. For those moving on, getting things set-up for Android is a bit more verbose, but I promise you, it is well worth walking through each step if you want to see a working test.
Android Studio and Android SDK tools
Most by now have migrated over to Android Studio as the default IDE / tool integration into the Android SDK, Maven and anything else involving Android development. If you do not have yet, download Android Studio (plus SDK tools) and install from[Android Studio Install](https://developer.android.com/studio/index.html). This will get your environment in the state it is needed for automation of Android devices. As mentioned in Part 1 of this mobile testing series, you should have installed appium-doctor. Now would be a good time to verify all Android requirements are in a working state by opening a terminal and running appium-doctor tests.1 | > appium-doctor --android |
Install SDK Platforms and tools for matching device
Go to your SDK Manager and install if not already, the latest Android SDK Tools and the Android SDK Platform-tools listed under tools drop-down.Also you will need at least one Android SDK Platform (API) for device(s) you would like to test. For example, Android 4.4.2 will be the API 19 and what you need to follow this demo. You will also need the Intel System and Google Images for Intel x86 Atom. Here is what should be installed:

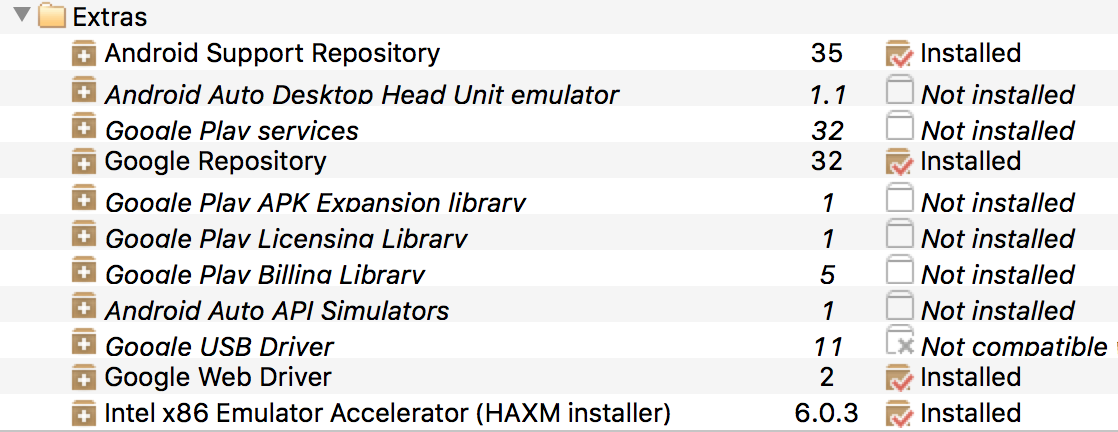
For the Extras, you should install Android Support Repository, Google Repository, Google Web Driver and the Intel x86 Emulator Accelerator (HAXM installer). Here is how mine looks after installed in the Android SDK Manager:
Install device(s) using Android Virtual Device Manager (AVD)
There are two options to access the AVD Manager; through Android Studio or CLI.Option 1) Using Android Studio:
- Open Android Studio -> open app or create one and open
- Open AVD manager
1 | > android avd |
Once in AVD select the “Create Virtual Device button in bottom left. Follow the steps selecting the Phone -> Nexus 6:

then select Next, followed by selecting API 19 x86 and make sure it is the Android 4.4 (with Google APIs) as that is the fastest available:

then select Next. From here it should show your AVD Name, Nexus 6 and KitKat information for final review:
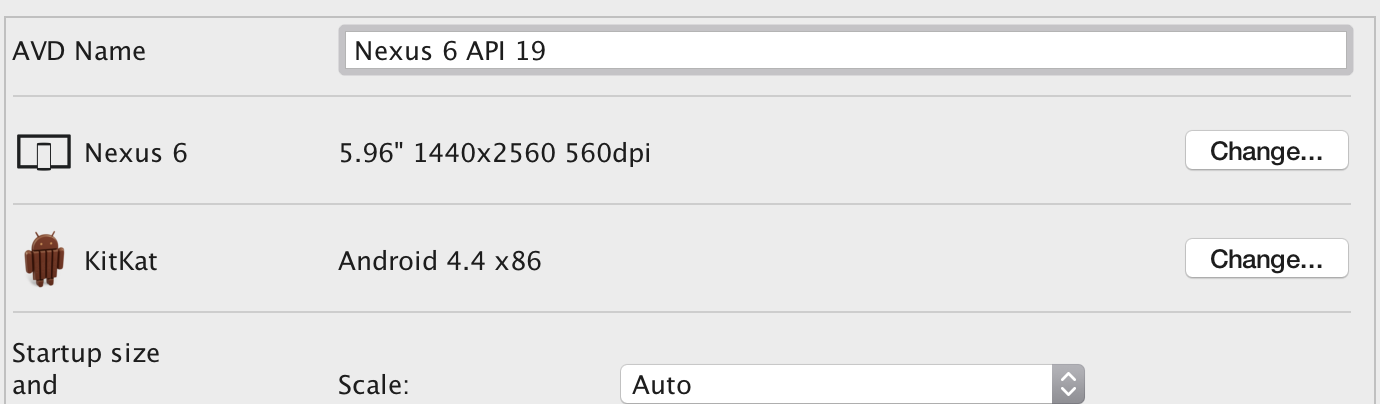
No need to modify any of this, accept the changes by selecting Finish. This will take you back to Your Virtual Devices dialog.

From here, you can select the play icon of the Nexus 6 API 19. We are doing this to confirm working, but also you will keep open for your next step; installing Chrome into the virtual device.
Install Chrome on the Virtual Device
It is important you install the right one if you want to automate Browser testing on the device with Nightwatch. You will find the Chrome apk files at:<a href=”http://www.apkmirror.com/apk/google-inc/chrome/“ target=”_blank” rel=”noopener”>http://www.apkmirror.com/apk/google-inc/chrome/.
Go to this site and find the latest Chrome APK for Android 4+. Here is the exact install I used to get only the apk file that works with above target device and selecting will start download:
<a href=”http://www.apkmirror.com/apk/google-inc/chrome/chrome-52-0-2743-98-release/chrome-52-0-2743-98-5-android-apk-download/download/“ target=”_blank” rel=”noopener”>chrome-52-0-2743-98-5-android-apk
Once downloaded, to install you use the Android Debug Bridge (adb) as it is the core CLI for communicating with Android devices from your OS. You need to have your Virtual Device running so it is visible to adb (you are already doing this in previous steps). Go to the root of your newly downloaded apk in command line (i.e. your download directory) and have adb install for you:
1 | > cd Downloads/ |
If installed without any errors, then open Chrome in the virtual device (your Nexus 6 API 19) manually, to confirm it exists and works. If not working or errors, you will need to uninstall and try a new Chrome apk. An uninstall can be done from the device in the app management just like any Android app, and needs to be done before installing another Chrome version. If you followed our default steps, you should not have any issues.
Install Selendroid Standalone Server
If you plan to use the 19 API as I use in the tutorial part of this blog, you are welcome to skip this entire section as Selendroid will not be required.Selendroid Standalone Server is not required anymore for Android devices as of API level 18 or higher. A bit of History, Appium has dropped Selendroid for the <a href=”https://developer.android.com/topic/libraries/testing-support-library/index.html#UIAutomator“ target=”_blank” rel=”noopener”>UI Autiomator bindings, but still is required for older devices (up to 17 API / Android 4.2.2).
Still intend on testing older Android devices? Alrighty then, moving forward. You can install the jar file manually or install in the terminal.
Option 1) Manual Installation of Selendroid:
To get the latest jar file, go to <a href=”http://selendroid.io/“ target=”_blank” rel=”noopener”>http://selendroid.io/ and at the bottom select the Download Jar button. Download and add to your nightwatch/bin directory. While at the website, you can check out the docs on Selendroid.
Option 2) CLI / Terminal Installation of Selendroid (the easy way):
Alternatively, you can directly install from your terminal the same as you did for the selenium jar in Part 1. Open a terminal and cd to root directory of the nightwatch repository you created. While in the root of your repository run these commands:
1 | > cd bin |
That’s it, we will start the Selendroid Server when we run our Nightwatch suite later.
Add your Android env to nightwatch.json
Open the nightwatch/bin/nightwatch.json and just under your ios :{} block you added in Part 1; add this block of code:- nightwatch.json
1
2
3
4
5
6
7
8
9
10
11
12
13
14"android" : {
"selenium_start_process": false,
"selenium_port" : 4723,
"selenium_host" : "127.0.0.1",
"silent": true,
"desiredCapabilities": {
"browserName": "Chrome",
"platformName": "Android",
"platformVersion": "4.4",
"device": "Android",
"deviceName": "Nexus_6_API_19",
"avd": "Nexus_6_API_19"
}
},
Here we have overwritten selenium globals to use port 4723, that is to access Appium and set to silent so all happens behind the scenes. Also notice the selenium_start_process is set to false, so we do not start the default Selenium Standalone we added to global setting in Part 1. The desiredCapabilities all override global Nightwatch setting along with passing requirements of Appium. I have found deviceName is used by Appium while avd is used by the actual virtual device and why we duplicate. You will change these along with platformVersion if you decide on testing against (and installed) other Android API’s.
Starting Appium Server
Because you have already installed Appium globally, we should have all the needed set-up to run tests on Android against the same tests we used for iOS in Part 1. Follow option 1 unless you are using Selendroid as discussed earlier.Option 1) Using Android API 19
In the first terminal lets start Appium:
1 | > appium |
Option 2) With Selendroid (Android API 17 or older only)
If you chose an older version of Android and would like to use Selendroid you will need to start Appium as well as the Selendroid Server from your terminal using this script from the Nightwatch repository root:
1 | appium & java -jar ./bin/selendroid-standalone-0.17.0-with-dependencies.jar |
Run your Tests with Nightwatch
Finally! With required server(s) running, in the second terminal, you will do the same as you did for when testing iOS, except you specify android as your environment. Back in the root of the nightwatch repository, in your terminal, enter test script:1 | bin/nightwatch --env android -t examples/tests/googlePageObject.js |
Conclusion
It would be a lie if I told you the actual act of getting Nightwatch to actually work on Android devices was easy. From the fact Nightwatch has very little documentation on Android integration and many online examples turned out to be dead-ends. But, with the efforts needed, by understanding Appium and other underpinnings of Nightwatch in more detail, it offered growth and a better appreciation of those who build software like this. I can honestly say, Nightwatch is one of the best test frameworks for testing Chrome on Android once configured appropriately and will be my go-to for production software testing in future projects.Until next time, please offer your experience and suggestions in the comments.