
In this rapid guide, we’ll set up a basic end-to-end test using Playwright with vanilla JavaScript. We’ll create a simple test to verify the header of this blog, demonstrating the fundamental concepts of Playwright testing.
Quick Setup: This guide focuses on getting you up and running with Playwright in under 15 minutes! Keep an eye out for future posts where we'll dive deeper into advanced testing patterns, page object models, and CI/CD integration.
Prerequisites
Before we begin, ensure you have:
- Node.js installed (version 14 or higher)
- Basic familiarity with JavaScript
- A code editor of your choice
Platform-Specific Setup
Choose your operating system below for Node.js installation instructions:
macOS Installation
- Install Node.js using Homebrew:
brew install node - Verify installation:
node --version
npm --version
Windows Installation
- Download Node.js installer from nodejs.org
- Run the installer with default settings
- Open Command Prompt and verify:
node --version
npm --version
Linux Installation
- Using Ubuntu/Debian:
curl -fsSL https://deb.nodesource.com/setup_lts.x | sudo -E bash - sudo apt-get install -y nodejs - Using Fedora:
sudo dnf install nodejs - Verify installation:
node --version
npm --version
Project Setup
Create a new directory and initialize your project:
- Create and navigate to your project directory:
mkdir playwright-quick-start cd playwright-quick-start - Initialize npm project:
npm init -y - Install Playwright:
Select these options during setup:npm init playwright@latest- Choose JavaScript (not TypeScript)
- Name your tests directory: "tests"
- Add GitHub Actions workflow: No
- Install Playwright browsers: Yes
Writing Our First Test
Create a new file tests/homepage.spec.js:
const { test, expect } = require('@playwright/test');

test('homepage has correct title and logo', async ({ page }) => {
  // Navigate to the blog
  await page.goto('https://shaneofalltrades.com');

  // Verify the logo text
  const logoText = await page.locator('h1.logo-wrap').textContent();
  expect(logoText).toContain('ShaneOfAllTrades');
});
Running the Test
Execute your test with:
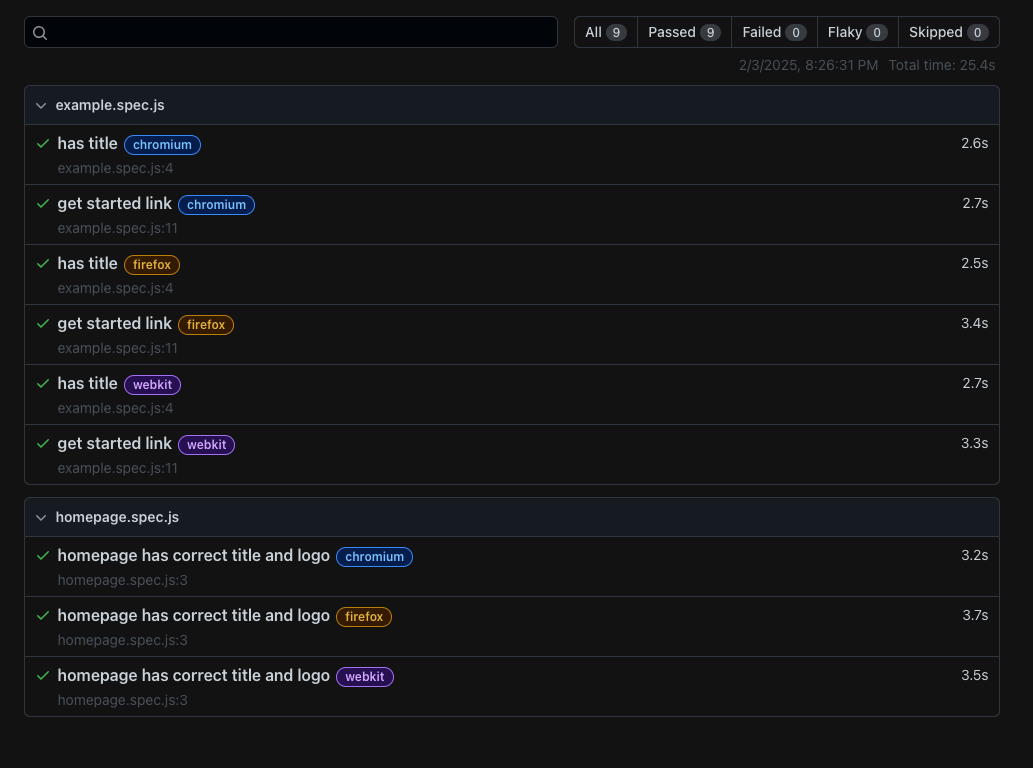
npx playwright testYou should see output similar to this:
Running 9 tests using 8 workers
  9 passed (25.4s)

To open last HTML report run:

  npx playwright show-report
Notice our 3 tests for 3 browsers, but also notice 9 tests total and Playwright generated 6 demo tests for each browser:
Understanding the Test
Let’s break down what our test does:
- Test Setup:
- Imports required Playwright modules
- Creates a new test case with descriptive name
- Navigation:
- Uses `page.goto()` to navigate to our blog
- Waits for page load automatically
- Verification:
- Locates the logo using CSS selector
- Verifies the expected text content
Troubleshooting Common Issues
- Browser Installation Issues:
- Windows: Run PowerShell as administrator
- Linux: Install additional dependencies:
sudo apt-get install -y libglib2.0-0 libnss3 libnspr4 \ libatk1.0-0 libatk-bridge2.0-0 libcups2 libdrm2 \ libdbus-1-3 libxcb1 libxkbcommon0 libx11-6 \ libxcomposite1 libxdamage1 libxext6 libxfixes3 \ libxrandr2 libgbm1 libpango-1.0-0 libcairo2 - macOS: Install Rosetta for M1/M2 Macs:
softwareupdate --install-rosetta --agree-to-license
- Permission Issues:
- Use `sudo` for Linux when needed
- Run as administrator for Windows
Next Steps
This basic example demonstrates Playwright’s simplicity for e2e testing. In upcoming posts, we’ll explore:
- Advanced selectors and assertions
- Testing form submissions and user interactions
- Setting up continuous integration
- Creating test reports and screenshots
- Testing responsive designs across different viewports
Stay tuned for more in-depth Playwright testing tutorials!